1. Pythonの基本的な考え
| 項目 | Python | Fortran90 |
|---|---|---|
| 変数の扱い | オブジェクトへの参照 | 値やメモリアドレスその物 |
| ポインタ演算 | できない | 通常は使わないが、拡張機能で可能 |
| メモリアドレス操作 | できない | 通常は使わないが、拡張機能で可能 |
| データの基本単位 | オブジェクト | 変数とアドレス |
| オブジェクトのサイズ | 大きい (型名等の情報を含む) | 通常は小さいが、構造体のサイズは大きい場合あり |
- オブジェクトとは、Pythonがデータを操作するための基本的な単位。
- オブジェクトとは、アドレスや値がまとまった 1 つ単位。
- Pythonでは、オブジェクトの参照を使ってオブジェクトにアクセスし、操作する。
- Pythonでは、オブジェクトの参照をポインタのように使う。
- オブジェクトの参照とポインタは似ている概念。
- ポインタはそれが指し示す先のメモリアドレスの格納先を示す
- オブジェクトの参照はオブジェクトの格納先を示す
- 1
つのオブジェクトには、様々な情報が含まれる。例えば以下の情報が含まれる。
- オブジェクトの型
- オブジェクトが属するデータ型(例:int, float, str, list, dict, etc.)
- オブジェクトの値
- オブジェクトが保持する実際のデータ。整数オブジェクトの場合は整数値、文字列オブジェクトの場合は文字列値
- オブジェクトの ID
- オブジェクトがメモリ上で一意に識別されるための識別子。通常、オブジェクトのメモリアドレスを示す。
- 参照カウント
- オブジェクトへの参照の数を示す。参照カウントが 0 になると、ガーベジコレクタによってメモリが解放される。
- メソッドと属性
- オブジェクトに関連付けられたメソッド(関数)と属性(変数)。オブジェクト指向プログラミングにおいて、オブジェクトはそれ自体が状態(属性)と振る舞い(メソッド)を持つ。
- オブジェクトの型
1.1. Pythonならではの特徴・慣習
- 可読性とシンプルさ
- 可読性の高いコードを書くことが重要視されており、PEP8というスタイルガイドが定められている
- インデントによるブロック表現
- Pythonは、波括弧{ }を使わずにインデントでコードブロックを表現する
- ダックタイピング(補足参照)
- Pythonは静的型付けではなく動的型付けの言語. そのため、オブジェクトが持つメソッドや属性に基づいて処理を行うダックタイピングという考え方が一般的
- デコレータ
- Pythonでは、関数やクラスの振る舞いを簡潔に変更できるデコレータ機能がある。デコレータは、関数やクラスに対して追加の機能を提供するために使われる。
- コンテキストマネージャ
- Pythonでは、withステートメントを使ってリソースの管理を簡潔に行える。これにより、ファイルのオープンやクローズ、ロックの取得と解放などの処理が簡単に記述できる。
- ジェネレータ
- Pythonのジェネレータは、反復可能なオブジェクトを簡潔に定義できる機能。
yieldキーワードを使って、関数をジェネレータに変換することができる。
- Pythonのジェネレータは、反復可能なオブジェクトを簡潔に定義できる機能。
- 多態性
- Pythonでは、継承やインターフェースを使って多態性を実現することができる。異なるクラスが同じメソッド名や属性を持つことで、コードの可読性や再利用性が向上する。
- 関数型プログラミングの要素
- Pythonは、関数型プログラミングの要素を持っている。
mapやfilter、reduceなどの高階関数や、無名関数であるlambdaを利用することができる。
- Pythonは、関数型プログラミングの要素を持っている。
- モジュールとパッケージ
- Pythonでは、機能やクラスをモジュールやパッケージに分割して整理することが一般的。これにより、コードの再利用性や可読性が向上する。
1.2. 補足
1.2.1. ダックタイピング
ダックタイピングとは、Pythonの柔軟性を象徴するプログラミングの概念。
Fortran90の場合
subroutine add(a, b, result)
  implicit none
  real, intent(in) :: a, b
  real, intent(out) :: result

  result = a + b
end subroutineFortran90では、add関数の引数の型が明示的に宣言されている。つまり、aとbは
real型であり、resultもreal型である場合しか使用できない。
Pythonの場合
def add(a, b):
return a + bPythonでは、add関数の引数の型が宣言されていない。つまり、aとbは実行時に型が決定されるため、整数、浮動小数点数、文字列、リストなど、どんな型でも使うことができる。
1.2.2. 型ヒント
型ヒントは、Pythonの柔軟性を維持しながら、型に関する情報を提供するために導入された。 型ヒントを使ってダックタイピングを実現する方法の一つは、typingモジュールのUnionやAnyなどのジェネリック型を使用することである。 これにより、関数が複数の型を受け入れることができるようになる。
ただし、型ヒントは型チェックツール(例:mypy)を使って静的型チェックで使用されるだけであり、python xxx.pyのように、pythonを通常に実行した際は無視される。
次の関数addは、int型とfloat型が入ってくることを想定して作られた。
1.2.2.1. 型ヒント無し
- 入力:指定なし(どんな型でも受け入れる)
- 出力:指定なし(出力はどんな型にでもなり得る)
def add(a, b):
    return a + b
型ヒントを追加してダックタイピングを維持するには、以下のように書く。
1.2.2.2. 型ヒント使用
- 入力:int型 or float型
- 出力:int型 or float型
def add(a: int, b: int) -> int:
return a + bこの型ヒントは、aとbが
int型であることを示している。戻り値も同様にint型である。
1.2.2.3. 型ヒント使用2
- 入力:int型 or float型
- 出力:int型 or float型
from typing import Union

def add(a: Union[int, float], b: Union[int, float]) -> Union[int, float]:
return a + bこの型ヒントは、aとbが int型または
float型のいずれかであることを示している。戻り値も同様に int型または
float型になる。
1.2.2.4. 型ヒント使用3
- 入力:どんな型でも OK(明示的にどんな型でも受け入れる)
- 出力:どんな型でも OK(明示的にどんな型でも受け入れる)
from typing import Any

def add(a: Any, b: Any) -> Any:
return a + bただし、Anyを使いすぎると、型ヒントの利点が失われることがあるため、適切なバランスが大切。
1.2.3. コンテキストマネージャ
withステートメントを使ってリソースの管理を簡潔に行うことができる。例えばファイルの書き込み時に、closeし忘れなどを防止する。
1.2.3.1. withステートメント不使用
f = open('file.txt', 'r')
content = f.read()
f.close() # close処理
close処理を忘れる可能性がある。
1.2.3.2. withステートメント使用
with open('file.txt', 'r') as f:
    content = f.read()
close処理を書かなくてよい。インデントを終えれば自動的にcloseされる。
1.2.4. ジェネレータ
def count_up_to(max):
    count = 1
    while count <= max:
        yield count # ジェネレータの利用
        count += 1

counter = count_up_to(5)
for number in counter:
    print(number)
1.2.5. 関数型プログラミングの要素
# map と lambda の使用例
squares = map(lambda x: x**2, range(10))
print(list(squares)) # output: [0, 1, 4, 9, 16, 25, 36, 49, 64, 81]

# filter の使用例
even_numbers = filter(lambda x: x % 2 == 0, range(10))
print(list(even_numbers)) # output: [0, 2, 4, 6, 8]
2. 型宣言
- Python3は動的型付け言語。
- 途中で整数型変数aに実数型(1.0)を入れると, エラー無しでaは実数型変数になる。
- Fortran90 は静的型付け言語。
- 途中で整数型変数aに実数度型(1.0)を入れると, エラー。
- 比較
- Pythonは動的型付けで、型宣言が必要ない。一方で Fortranは静的型付けで、型宣言が必要。
- Pythonは明示的に
a = int(0)と書けるが、a=0が推奨。
2.1. 変数定義の例
import numpy as np

if __name__ == '__main__':
  print("Hello world!")  # Hello world!

  # Python Build-in type

  a = 42  # integer no limit bit
  print(a, type(a))  # 42 <class 'int'>

  a = 3.14  # float 64bit
  print(a, type(a))  # 3.14 <class 'float'>

  a = 1 + 8j  # complex 64bit
  print(a, type(a))  # (1+8j) <class 'complex'>

  # Numpy type

  a = np.int32(7)  # numpy integer 32bit
  print(a, type(a))  # 7 <class 'numpy.int32'>

  a = np.float64(9.0)  # numpy float 64bit
  print(a, type(a))  # 9.0 <class 'numpy.float64'>

  a = np.complex128(1.0 + 2.0j)  # numpy complex 128bit
  print(a, type(a))  # (1+2j) <class 'numpy.complex128'>

  a = np.zeros(3, dtype='float64')  # numpy ndarray float 64bit
  print(a, type(a))  # [0. 0. 0.] <class 'numpy.ndarray'>

  # Numpy type is stronger than Build-in type

  a = 2.0
  b = np.float64(3.14)
  c = a * b
  print("{}, {}".format(c, type(c)))  # 6.28, <class 'numpy.float64'>

  # Simultaneous substitution (but it is slow)

  a, b = 3, np.float64(5.2)
  print(a, type(a))  # 3 <class 'int'>
  print(b, type(b))  # 5.2 <class 'float'>

  # Swap a and b

  a, b = b, a
  print(a, type(a))  # 5.2 <class 'numpy.float64'>
  print(b, type(b))  # 3 <class 'int'>
2.2. Pythonの通常のスカラー型
| 変数 | 整数型 | 実数型 | 複素数型※ |
|---|---|---|---|
| 書き方 | a = 0 |
a = 0.0 |
a = 1.0 + 2.0j |
| 桁数 | - | 15~17 桁 | 15~17 桁 |
| 範囲 | 下限、上限なし | ±1.797x10308 | ±1.797x10308 |
| 容量 | - | 8byte (64bit) | 16byte (128bit) |
| 最小 | 1 | 2.22x10⁻¹⁶ | 2.22x10⁻¹⁶ |
※複素数型において、実部・虚部それぞれが実数型と同じ精度を持つ。
※Pythonに単精度実数型は存在しない。実数型=倍精度型と思えばよい。
その他の型
- 文字型
a = 'c' - 文字列型
a = 'hello' - 論理型
a = False
2.3. Numpyを使用する場合のスカラー型
| 変数 | int32 | float64 | complex128※ |
|---|---|---|---|
| 書き方 | a = np.int32(0) |
a = np.float64(0.0) |
a = np.complex128(1.0+2.0j) |
| 桁数 | 9~10 桁 | 15~17 桁 | 15~17 桁 |
| 範囲 | ±2 147 483 647 | ±1.797x10308 | ±1.797x10308 |
| 容量 | 4byte (32bit) | 8byte (64bit) | 16byte (128bit) |
| 最小 | 1 | 2.22x10⁻¹⁶ | 2.22x10⁻¹⁶ |
※complex128において、実部・虚部それぞれがfloat64と同じ精度を持つ。
※Numpyの型にスカラーと配列の区別は存在しない。スカラーは大きさ1の配列としていつも考えること。
※Numpyの基本型に4倍精度型は存在しない。ただしfloat128はプラットフォーム依存で実装されている場合がある。
2.4. 動的型付け
a = 42  # aは整数型
print(type(a))  # <class 'int'>
a = 3.14  # aは整数型から実数型に変わる
print(type(a))  # <class 'float'>
3. 配列
- 異なる型データを同じ配列に入れたい場合、Build-inのリスト (list) またはタプル (tuple) を使用する。
- 同一の型を持つデータで数値データの場合、Numpyのndarrayを使用する (Fortranの配列相当はこちら)。
3.1. list, tuple, ndarrayの違い
- listとtuple
- 要素一つ一つがオブジェクトへの参照
- 異なる型の要素を許容できる反面、要素ごとに参照先を確認しなければならないため、遅い。
- 例えば float型(64bit)の要素をいくつか入れたlistの場合、ある要素の先頭から、次の要素の先頭アドレスまでの間隔は64bitではない。参照先が連続しているかもしれないし、非常に遠いメモリアドレスにあるかもしれない(メモリのランダムアクセスが生じる)。
- 要素の追加・削除が容易
- ndarray
- 要素一つ一つが同じデータ型
- 例えばfloat64の場合、ndarrayのある要素の先頭アドレスから64bit先のメモリが、必ず次の要素のアドレスになる(ようにメモリが確保される)。
- 要素の追加・削除は不可。サイズ変更には、新たなndarrayを作成する必要がある。
| 項目 | リスト (List) | タプル (Tuple) | ndarray (numpy array) |
|---|---|---|---|
| Mutable(変更可能性) | 可能 (Mutable) | 不可能 (Immutable) | 可能 (Mutable) |
| 複数の型の共存 | 可能 | 可能 | 不可能 (一般的に) |
| インデックス操作 | 可能 | 可能 | 可能 |
| スライス操作 | 可能 | 可能 | 可能 |
| データ構造 | 可変長配列 | 固定長配列 | 固定長配列 (多次元配列) |
| メモリ使用効率 | タプルやndarrayに比べてやや劣る | 良い | 良い (特に大規模データ) |
| 使用目的 | 汎用的なデータ構造。一般的なデータ操作に使用。 | 不変なデータ構造。辞書のキーや、変更されるべきでないデータに使用。 | 数値計算や科学技術計算。大規模な数値データの効率的な処理や、線形代数、統計処理に使用。 |
3.2. list
3.2.1. 一連の動作
if __name__ == "__main__":

    # 定義・宣言
    x = [1, "af", 3.4, 1 + 2j, "a"]  # list (mutable)

    # 要素の読み出し
    y = x[1]
    print(y)  # "af"

    # 長さの取得
    y = len(x)
    print(y)   # 5

    # スライス操作 (どのようにコピーされるかは次章参照)
    y = x[1:3]
    print(y)  # ['af', 3.4]

    # 要素のインデックス取得
    y = x.index("a")
    print(y)  # 4

    # 代入方法
    x = [1, "af", 3.4, 1 + 2j, "a"]
    x[1] = "b"
    print(x)  # [1, 'b', 3.4, (1+2j), 'a']

    # 要素の追加
    x = [1, "af", 3.4, 1 + 2j, "a"]
    x.append("c")
    print(x)  # [1, 'af', 3.4, (1+2j), 'a', 'c']

    # 要素の削除
    x = [1, "af", "a", 3.5, 1 + 2j, "a"]
    x.remove("a")
    print(x)  # [1, 'af', 3.5, (1+2j), 'a']
3.2.2. listでコピーされるもの、されないもの
if __name__ == "__main__":
    # 定義・宣言
    x = [1, [2, 3], [4, 5, 6], "a", 88]  # list (mutable)

    # スライス操作
    y = x[2:4]
    print(y)  # [[4, 5, 6], 'a']

    # yの要素(リスト)を変更
    print(x)  # [1, [2, 3], [4, 5, 6], "a", 88]
    y[0][1] = 999 # リストの要素[4,5,6]はmutableなので、参照元のxも変更される。
    y[1] = "t" # 文字はimmutableなので、参照元のxは変更されず、コピーされたyのみ変更される。

    print(x)  # [1, [2, 3], [4, 999, 6], 'a', 88]
    print(y)  # [[4, 999, 6], 't']
3.2.3. listの一次元配列
3.2.3.1. 基本
if __name__ == "__main__":

  x = [1, 2, 3, 4, 5, 6]

  element = x[2]  # 3(3番目の要素)
3.2.3.2. listの全ての要素を操作(リスト内包表記)
# 4. 関数の定義
def func(i: int) -> float:
    return 0.1 * i


if __name__ == '__main__':

    # 要素数を設定
    n = 10

    # 空の一次元リストを作成
    arr = [0 for _ in range(n)]

    # iのインデックスを要素に持つリストを作成
    for i in range(n):
        arr[i] = func(i)

    print(arr) # [0.0, 0.1, 0.2, 0.3, 0.4, 0.5, 0.6, 0.7, 0.8, 0.9]
3.2.4. listの二次元配列
3.2.4.1. 基本
if __name__ == "__main__":

  x = [
      [1, 2, 3],
      [4, 5, 6],
      [7, 8, 9]
  ]

  element = x[1][2]  # 6(2行目、3列目の要素)
3.2.4.2. listの全ての要素を操作(リスト内包表記)
def func(i: int, j: int) -> float:
    return 0.1 * i * j


if __name__ == '__main__':

    # 行数と列数を設定
    nrows, ncols = 4, 4

    # i行目j列目のインデックスを要素に持つリストを作成
    arr = [[func(i, j) for j in range(ncols)] for i in range(nrows)]

    for row in arr:
        print(row)
3.2.4.3. for文によるlistの配列要素への代入方法
def func(i: int, j: int) -> float:
    return 0.1 * i * j


if __name__ == '__main__':

    # 行数と列数を設定
    nrows, ncols = 4, 4

    # 空の二次元リストを作成
    arr = [[0 for _ in range(ncols)] for _ in range(nrows)]

    # i行目j列目のインデックスを要素に持つリストを作成
    for i in range(nrows):
        for j in range(ncols):
            arr[i][j] = func(i, j)

    for row in arr:
        print(row)

    # [0.0, 0.0, 0.0, 0.0]
    # [0.0, 0.1, 0.2, 0.3]
    # [0.0, 0.2, 0.4, 0.6]
    # [0.0, 0.3, 0.6, 0.9]
3.2.4.4. 二次元リストの特定の行または列の取得
matrix = [
    [1, 2, 3],
    [4, 5, 6],
    [7, 8, 9]
]

first_row = matrix[0] # 一行目を取得
print(first_row)  # [1, 2, 3]

first_column = [row[0] for row in matrix] # 一列目を取得
print(first_column)  # [1, 4, 7]
3.2.5. 等間隔の要素を持つリストを作成する場合
3.2.5.1. (推奨)ndarrayで作成してからlistへ変換する
import numpy as np


def generate_sequence_np(start, step, count):
    stop = start + (count - 1) * step
    return np.linspace(start, stop, count).tolist()


if __name__ == "__main__":
    start_value = 3.0
    step_value = 0.5
    num_elements = 8

    sequence = generate_sequence_np(start_value, step_value, num_elements)
    print(sequence)   # [3.0, 3.5, 4.0, 4.5, 5.0, 5.5, 6.0, 6.5]
3.2.5.2. (非推奨)list のまま計算・作成する
def generate_sequence(start, step, count):
    return [start + i * step for i in range(count)]

if __name__ == "__main__":
    start_value = 3.0
    step_value = 0.5
    num_elements = 8

    sequence = generate_sequence(start_value, step_value, num_elements)
    print(sequence)  # [3.0, 3.5, 4.0, 4.5, 5.0, 5.5, 6.0, 6.5]
3.3. tuple
if __name__ == "__main__":
    # 定義・宣言
    x = (1, "af", 3.4, 1 + 2j, "a")  # tuple (immutable)

    # 要素の読み出し
    y = x[1]
    print(y)

    # 長さの取得
    y = len(x)
    print(y)

    # スライス操作
    y = x[0:2]
    print(y)

    # 要素のインデックス取得
    y = x.index('p')
    print(y)

    # x[1] = 'b'  # タプルは不変であるため、代入不可
    # x.append(9)  # タプルは不変であるため、要素の追加は不可
    # x.remove('a')  # タプルは不変であるため、要素の削除は不可
3.3.1. tuple の一次元配列
if __name__ == "__main__":
  x = (1, 2, 3, 4, 5, 6)

  element = x[2]  # 3(3番目の要素)
3.3.2. tuple の二次元配列
if __name__ == "__main__":

  x = (
      (1, 2, 3),
      (4, 5, 6),
      (7, 8, 9)
  )

  element = x[1][2]  # 6(2行目、3列目の要素)
3.4. 辞書
Pythonの辞書では、値として任意の型のオブジェクトを格納することが可能。リストも格納することが可能。
反対にリストに辞書を格納することも可能。
3.4.1. 辞書の作成
my_dict = {"apple": 1, "banana": 2, "cherry": 3}このコードは、appleというキーに対して1という値、bananaに対して2という値、cherryに対して3という値を格納した辞書を作成します。
3.4.2. 値のアクセス
print(my_dict["apple"]) # Output: 1キーを使って辞書から値を取り出すことができる。
3.4.3. 値の設定または変更
my_dict = {"apple": 1, "banana": 2, "cherry": 3}
my_dict["apple"] = 4  # Update existing key
my_dict["mango"] = 5  # Add new key-value pair

print(my_dict)
{'apple': 4, 'banana': 2, 'cherry': 3, 'mango': 5}
既存のキーの値を更新したり、新しいキーと値のペアを追加したりすることができる。
3.4.4. キーの存在確認
if "apple" in my_dict:
print("Apple is in the dictionary.")in演算子を使ってキーが辞書に存在するかどうかを確認することができる。
3.4.5. キーでループを回す
my_dict = {"apple": 1, "banana": 2, "cherry": 3}
for k in my_dict.keys():
    print(k, my_dict(k))
# apple 1
# banana 2
# cherry 3
3.4.6. 辞書内包表記
3.4.6.1. 基本的な使い方
my_dict = {str(i): i for i in range(5)}このコードは、'0'から'4'までの文字列をキーとし、それぞれに対応する整数を値とした辞書を作成する。
つまり、{'0': 0, '1': 1, '2': 2, '3': 3, '4': 4}という辞書が得られる。
3.4.6.2. 説明
Pythonの辞書内包表記(dictionary comprehension)はリスト内包表記と非常に似ているが、キーと値のペアを生成する点が異なる。以下に基本的な形を示す。
my_dict = {key_expression : value_expression for item in iterable}key_expressionとvalue_expressionはそれぞれ辞書のキーと値を計算する式で、itemはiterableから取り出された項目を参照する。
3.4.6.3. リストから辞書を生成
次のようにリストを取り、それぞれの要素をキーとし、その要素の長さを値とする辞書を生成することができる。
words = ['apple', 'banana', 'cherry']
length_dict = {word: len(word) for word in words}
print(length_dict)  # Output: {'apple': 5, 'banana': 6, 'cherry': 6}
3.4.6.4. 条件を付けてリストから辞書を生成
辞書内包表記は、条件式を含むことも可能。条件式を含めると、その条件に合致する項目だけで辞書が生成される。例えば、次のようにリストの要素から、長さが5以上の単語だけをキーとする辞書を生成することができる。
words = ['apple', 'banana', 'cherry', 'kiwi']
length_dict = {word: len(word) for word in words if len(word) >= 5}
print(length_dict)  # Output: {'apple': 5, 'banana': 6, 'cherry': 6}
3.4.7. 辞書にリストを格納
3.4.7.1. リストを値として持つ辞書の作成
my_dict = {"fruits": ["apple", "banana", "cherry"], "numbers": [1, 2, 3]}このコードは、fruitsというキーに対して["apple", "banana", "cherry"]というリストを値とし、numbersというキーに対して[1, 2, 3]というリストを値とした辞書を作成する。
3.4.7.2. 辞書内のリストへアクセス
print(my_dict["fruits"]) # Output: ['apple', 'banana', 'cherry']キーを使って辞書からリストを取り出すことができる。
3.4.7.3. リストに値を追加
my_dict = {"fruits": ["apple", "banana", "cherry"], "numbers": [1, 2, 3]}
my_dict["fruits"].append("mango")
print(my_dict) # {'fruits': ['apple', 'banana', 'cherry', 'mango'], 'numbers': [1, 2, 3]}辞書から取り出したリストに直接値を追加することも可能。この例では、fruitsのリストにmangoを追加する。
3.4.7.4. 新しいリストの追加
my_dict = {"fruits": ["apple", "banana", "cherry"], "numbers": [1, 2, 3]}
my_dict["vegetables"] = ["carrot", "potato"]
print(my_dict) # {'fruits': ['apple', 'banana', 'cherry'], 'numbers': [1, 2, 3], 'vegetables': ['carrot', 'potato']}
3.4.7.5. getメソッド
もし、定義した辞書に存在しないキーを渡すと、PythonはKeyErrorというエラーを発生させる。
しかし、getメソッドを使用すると、キーが存在しない場合でもエラーを返さずに、指定したデフォルト値を返させることができる。キーが存在する場合は、そのキーに応じた値が返ってくる。
デフォルト値はgetメソッドの第二引数で指定する。
my_dict = {"apple": 1, "banana": 2, "cherry": 3}
print(my_dict.get("apple", 0))  # Output: 1, キーが存在するので、appleの値1を返す。
print(my_dict.get("mango", 0))  # Output: 0, キーが存在しないので、デフォルト値0を返す。
3.4.7.6. 辞書の結合
2つ以上の辞書を結合するには、updateメソッドまたは
** 演算子を使用する。
dict1 = {"apple": 1, "banana": 2}
dict2 = {"cherry": 3, "mango": 4}
dict1.update(dict2)
print(dict1)  # Output: {'apple': 1, 'banana': 2, 'cherry': 3, 'mango': 4}

dict1 = {"apple": 1, "banana": 2}
dict2 = {"cherry": 3, "mango": 4}
combined_dict = {**dict1, **dict2}
print(combined_dict)  # Output: {'apple': 1, 'banana': 2, 'cherry': 3, 'mango': 4}
3.4.7.7. キーと値の反転
my_dict = {"apple": 1, "banana": 2, "cherry": 3}
reversed_dict = {v: k for k, v in my_dict.items()}
print(reversed_dict)  # Output: {1: 'apple', 2: 'banana', 3: 'cherry'}
3.5. np.ndarray
| 項目 | Python3 (import numpy as npを前提) |
|---|---|
| 1 次元配列 | |
| 整数型 | x = np.zeros(N, dtype=int) |
| 実数型 | x = np.zeros(N, dtype=float) |
| 動的配列 | x = np.zeros(N, dtype=float) |
| 入出力 | x[0] = 3.0 |
| 2 次元配列 | |
| 整数型 | x = np.zeros((N, M), dtype=int) |
| 実数型 | x = np.zeros((N, M), dtype=float) |
| 動的配列 | x = np.zeros((N, M), dtype=float)del x |
| 入出力 | x[0,1] = 3.0 |
- Pythonのインデックスは 0 始まり。Fortranは 1 始まり。
- Pythonでは、配列の動的確保・解放が必要ない。
- Fortran90では、allocatable属性を持つ配列に対して allocateおよび、deallocateが必要。
- Pythonでは、ガーベジコレクタが自動的にメモリ解放を行うため、通常は明示的なメモリ解放を行う必要はない。
- メモリ消費や、メモリリークを防ぎたい場合、
del xで明示的に解放できる。
- メモリ消費や、メモリリークを防ぎたい場合、
https://numpy.org/doc/stable/reference/arrays.ndarray.html
3.5.1. ndarrayの一次元配列
import numpy as np

if __name__ == "__main__":

  x = [1, 2, 3, 4, 5, 6]

  element = x[2]  # 3(3番目の要素)
3.5.1.1. 等間隔のndarray配列を作成する
3.5.1.1.1. インデックスを値に持つndarrayを作成する
import numpy as np

length = 4
indices = np.arange(length)
print(indices) # [0 1 2 3]一次元の場合はnp.arange(),二次元以上の多次元配列の場合はnp.indices()を使用して作成する。
3.5.1.1.2. 初期値、刻み幅、個数を指定して作成
import numpy as np

def generate_sequence_np(start, step, count):
    stop = start + (count - 1) * step
    return np.linspace(start, stop, count)

if __name__ == "__main__":
    start_value = 3.0
    step_value = 0.5
    num_elements = 8

    sequence = generate_sequence_np(start_value, step_value, num_elements)
    print(sequence)   # [3.0, 3.5, 4.0, 4.5, 5.0, 5.5, 6.0, 6.5]
3.5.1.1.3. ベクトル化して代入(推奨)
import numpy as np

# 関数の定義
def func(x: float) -> float:
    return x * 2 + 1

# 関数のベクトル化
vectorized_func = np.vectorize(func)

if __name__ == '__main__':
    # xの配列を生成
    x = np.linspace(0, 5, 6)  # [0. 1. 2. 3. 4. 5.]
    print(x)

    # 配列xに関数を適用してyの配列を生成
    y = vectorized_func(x)

    print(y)  # [ 1.  3.  5.  7.  9. 11.]
3.5.2. ndarrayの二次元配列
import numpy as np

if __name__ == "__main__":

  x = np.array([
      [1, 2, 3],
      [4, 5, 6],
      [7, 8, 9]
  ])

  element = x[1, 2]  # 6(2行目、3列目の要素)
3.5.2.1. ndarrayの配列要素への代入方法
3.5.2.1.1. ベクトル化して代入(推奨)
import numpy as np


# 関数の定義
def func(i:int, j:int) -> float:
    return 0.1 * i * j

# 関数のベクトル化
vectorized_func = np.vectorize(func)

if __name__ == '__main__':

    # i行目j列目のインデックスを要素に持つ配列を作成、0始まりで作成される
    rows, cols = np.indices((4, 4))
    # rows += 1  # 行インデックスを1始まりにする場合
    # cols += 1  # 列インデックスを1始まりにする場合

    arr = vectorized_func(rows, cols)
    print(arr)
出力結果
[[0.  0.  0.  0. ]
 [0.  0.1 0.2 0.3]
 [0.  0.2 0.4 0.6]
 [0.  0.3 0.6 0.9]]
3.5.2.1.2. 直接代入:明解だが非常に遅い
import numpy as np

# 関数の定義
def func(i, j):
    return 0.1 * i * j

if __name__ == '__main__':

  # 4x4の実数型二次元配列を作成
  arr = np.zeros((4, 4), dtype=float)

  # 配列の要素に代入
  for i in range(arr.shape[0]):
      for j in range(arr.shape[1]):
          arr[i, j] = func(i,j)

  print(arr)
3.5.2.2. ndarrayの持つ情報・メソッド
| 属性/メソッド | 説明 |
|---|---|
| dtype | 配列の要素のデータ型を示す。 |
| ndim | 配列の次元数を示す。 |
| size | 配列の全要素数を示す。 |
| itemsize | 配列の各要素のバイトサイズを示す。 |
| nbytes | 配列の全要素のバイトサイズを示す(itemsize * size)。 |
| T | 配列の転置を返す。 |
| astype(dtype) | 指定されたデータ型に変換された新しい配列を返す。 |
| reshape(shape) | 指定された形状に変換された新しい配列を返す。 |
| flatten() | 配列を 1 次元に平坦化した新しい配列を返す。 |
| tolist() | 配列を Pythonリストに変換する。 |
| copy() | 配列のコピーを作成する。 |
他にndarrayがどのような情報を持っているかを確認するためには、下記の正式ドキュメントを参照すること。 https://numpy.org/doc/stable/reference/arrays.ndarray.html
3.5.3. ベクトル化
np.vectorize()によるベクトル化が出来る。np.vectorize()の主な目的は、元の関数がndarrayで直接使えない場合に、その関数をベクトル化し、ndarray に適用できるようにすることnp.vectorize()によるベクトル化は、元の関数のループを隠蔽するだけで、実際の処理速度の向上は見込めない
3.5.3.1. ベクトル演算になっている場合
import numpy as np

def add_five(arr: np.ndarray) -> np.ndarray:
    return arr + 5 # ndarrayに整数を足す操作は、ndarrayの特別な操作 = 内部的にベクトル演算となっている

# NumPyのndarrayを使ってテスト
array = np.array([0, 1, 2, 3, 4])
result = add_five(array)
print(result)  # [5 6 7 8 9]
3.5.3.2. ベクトル演算になっていない場合
import numpy as np

def add_five(arr: np.ndarray) -> np.ndarray:
    result = np.empty_like(arr)
    for i, value in enumerate(arr): # 各要素にアクセスする操作は、ベクトル演算に対応していない
        result[i] = value + 5
    return result

# NumPyのndarrayを使ってテスト
array = np.array([0, 1, 2, 3, 4])
result = add_five(array)
print(result)  # [5 6 7 8 9]
3.5.3.3.
np.vectorize()を使用するベクトル化
import numpy as np


# 関数の定義
def func(i: int) -> float:
    return 0.1 * i


# 関数のベクトル化
vectorized_func = np.vectorize(func)

if __name__ == '__main__':

    # i番目のインデックスを要素に持つ配列を作成、0始まりで作成される
    x = np.arange(4)

    # 下記のように書くと、ベクトル演算ではない
    arr1 = np.zeros(x.shape[0])
    for i, val in enumerate(x):
        arr1[i] = func(i)
    print(arr1)

    # 下記のように書くと、ベクトル演算
    # (ただし、np.vectorize()によるベクトル化だと処理速度は向上しない)
    arr = vectorized_func(x)
    print(arr)```
4. map関数、filter関数、リスト内包表記とラムダ関数
- map関数、filter 関数、リスト内包表記は、イテラブルオブジェクトに対して使用可能な Python固有の関数。
- map()関数は、リスト(または他のイテラブル)内のすべての要素に対して、指定された関数を適用するための関数
- filter()関数は、リスト(または他のイテラブル)から条件に合致する要素だけを抽出するための関数
- リスト内包表記は、リストを生成するための簡潔で効率的な構文
- ラムダ関数を使うことで、一度しか使用しない短い関数を定義する必要がなくなり、コードを簡潔に出来る
- ただし、複雑な処理を行う場合や、関数が再利用される場合は、通常の関数定義を使った方が可読性が高くなる
4.1. map関数
map()関数は、リスト(または他のイテラブル)内のすべての要素に対して、指定された関数を適用するための関数
map(function, iterable)- function: 各要素に適用される関数。
- iterable: リストやタプルなどのイテラブル。
4.1.1. 例)リスト内のすべての要素を 2 倍する
numbers = [1, 2, 3, 4, 5]

def double(x):
    return x * 2

doubled_numbers = list(map(double, numbers))
print(doubled_numbers) # [2, 4, 6, 8, 10]
map()関数はイテレータを返すため、通常は list()関数を使ってリストに変換する。
4.1.2. 例)ラムダ関数を使用して、リスト内のすべての要素を 2 倍する
numbers = [1, 2, 3, 4, 5]
doubled_numbers = list(map(lambda x: x * 2, numbers))
print(doubled_numbers) # [2, 4, 6, 8, 10]
4.2. filter関数
filter()関数は、リスト(または他のイテラブル)から条件に合致する要素だけを抽出するための関数
filter(function, iterable)- function: 各要素に適用される条件を表す関数です。この関数は真偽値を返す必要があります。
- iterable: リストやタプルなどのイテラブルです。
4.2.1. 例)リストから偶数だけを抽出する
numbers = [1, 2, 3, 4, 5, 6, 7, 8, 9, 10]

def is_even(x):
    return x % 2 == 0

even_numbers = list(filter(is_even, numbers))
print(even_numbers) # [2, 4, 6, 8, 10]
filter()関数はイテレータを返すため、通常は list()関数を使ってリストに変換する。
4.2.2. 例)ラムダ関数を使用して、リストから偶数だけを抽出する
numbers = [1, 2, 3, 4, 5, 6, 7, 8, 9, 10]
evens = list(filter(lambda x: x % 2 == 0, numbers))
print(evens)
4.3. リスト内包表記
[expression for item in iterable if condition]- expression: 各要素に適用される式
- item: イテラブル内の要素を表す変数
- iterable: リストやタプルなどのイテラブル
- condition: オプションで指定できる条件。条件に合致する要素のみがリストに含まれる
4.3.1. 例)リスト内の偶数だけを取得し、それらを 2 倍にする
numbers = [1, 2, 3, 4, 5, 6, 7, 8, 9, 10]
doubled_evens = [x * 2 for x in numbers if x % 2 == 0]
print(doubled_evens) # [4, 8, 12, 16, 20]
4.4. 補足
4.4.1. イテラブルオブジェクトとは
イテラブルオブジェクトは、__iter__()メソッドを実装しているか、__getitem__()メソッドが
0
から始まるインデックスで要素を取得できるように実装されていることが条件。
主なイテラブルオブジェクト
- リスト (List): イテラブル
- タプル (Tuple): イテラブル
- 文字列 (String): イテラブル
- 辞書 (Dictionary): イテラブル(キーのみ)
- 集合 (Set): イテラブル
- Numpyの ndarray: イテラブル
- pandas のデータフレーム (DataFrame): イテラブル(列のラベルのみ)
- pandas のシリーズ (Series): イテラブル
5. コピー・基本演算
5.1. 演算子
5.1.1. 算術演算子
| 項目 | Python3 | Fortran90 |
|---|---|---|
| 整数 | a = 5; b = 2; |
a = 5; b = 2; |
| ・ 和 | x = a + b |
x = a + b |
| ・ 差 | x = a - b |
x = a - b |
| ・ 積 | x = a * b |
x = a * b |
| ・ 商 | x = a // b # 2 |
x = a / b |
| ・ 剰余 | x = a % b |
x = mod(a, b) |
| ・ 乗数 | x = a ** b |
x = a**b |
| 実数 | a = 1.0; b = 2.0; |
a = 1.0d0; b = 2.0d0; |
| 複素数 | a = 1+2j; b = 3+4j; |
a = cmplx(1d0,2d0); b = cmplx(3d0,4d0) |
| ・ 和 | x = a + b |
x = a + b |
| ・ 差 | x = a - b |
x = a - b |
| ・ 積 | x = a * b |
x = a * b |
| ・ 商 | x = a / b |
x = a / b |
| ・ 乗数 | x = a ** b |
x = a**b |
| 文字型 | a = 'a'; b = 'b'; x = a + b # 'ab' |
a = 'a'; b = 'b'; x = a // b |
| 異なる型 | a = 1; b = 2.0; x = a + b # 3.0 |
a = 1; b = 2.0d0; x = a + b |
a = 2.0; b = 3+4j; x = a + b |
a = 2.0d0; b = cmplx(3d0, 4d0); x = a + b |
5.1.2. ビット演算子
| 演算子 | 書き方の例 | 意味 |
|---|---|---|
| & | x & y | x と y のビットごとの AND |
| | | x | y | x と y のビットごとの OR |
| ^ | x ^ y | x と y のビットごとの XOR |
| ~ | ~x | x のビットごとの NOT |
| << | x << n | x を n ビット左にシフト |
| >> | x >> n | x を n ビット右にシフト |
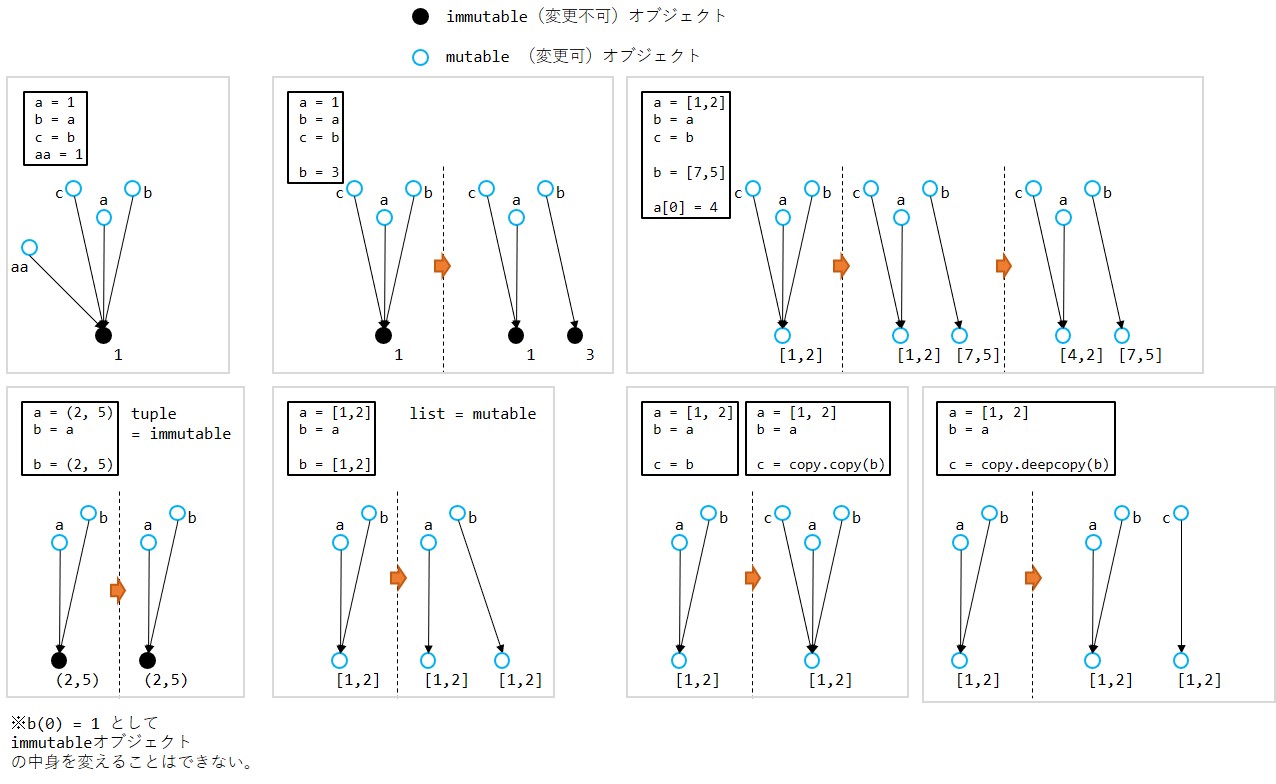
5.2. mutableオブジェクト, immutableオブジェクト
mutableオブジェクト
- オブジェクトの状態を変更できるオブジェクト
- リスト、辞書、集合(set)などがmutableオブジェクト
- 要素の追加・削除・変更が可能
immutableオブジェクト
- オブジェクトの状態を変更できないオブジェクト
- 数値、文字列、タプルなどがimmutableオブジェクト
- 一度作成されると状態を変更できない。
下記のようにimmutableオブジェクト(タプル)を確保した場合、(2,3,9)と(1,4,8)は別メモリに確保される。(1,4,8)にアクセスできなくなるが、メモリ領域上に確保されたままになってしまう(ただし、ガーベジコレクタによって、いずれ解放される)。
immutableオブジェクトなので、要素の書き変えは出来ない。
a = (1,4,8) #tuple, immutable
# a(0) = 2 # 不可
# a(1) = 3 # 不可
# a(2) = 9 # 不可
a = (2,3,9) # 可(動的型付けで、新たなタプルを作成)下記のようにmutableオブジェクト(リスト)を確保した場合、[1,4,8]が直接書き換わるので、同一メモリ上の値が書き換わる。
mutableオブジェクトなので、要素の書き変えができる。
a = [1,4,8] #list, immutable
a[0] = 2 # 可
a[1] = 3 # 可
a[2] = 9 # 可
print(a) # [2,3,9]
a = [7,6,1] # 可(動的型付け)
5.3. Sharrow copy, Deep copy
| Sharrow copy 浅いコピー |
Deep copy 深いコピー |
|---|---|
| オブジェクトの参照をコピー | オブジェクト(ネストされたものまで)をコピー |
- Pythonで
b=a,b=copy.copy(a)と書いた場合、それは浅いコピーを意味する。a自体(ポインタ)をコピーするイメージ。 - Pythonで
b=copy.deepcopy(a)と書いた場合、それは深いコピー(全部コピー)になる。aの示す先の値をコピーするイメージ。
5.4. mutable, immutable に対する Sharrow copy と Deep copy
| 特徴 | mutableオブジェクト | immutable オブジェクト |
|---|---|---|
| 状態変更 | 可能 | 不可能 |
| 例 | リスト、辞書、集合(set) | 数値、文字列、タプル |
| 浅いコピー | オブジェクトの参照をコピー | 問題なし(状態変更不可) |
| 深いコピー | 全オブジェクトをコピー | 通常は必要なし(状態変更不可) |
6. キャスト
6.1. 変数の型
| 変換先の型 | キャスト方法 | 元の型 |
|---|---|---|
int |
int(x) |
float, np.float64,
np.float32, np.float_,
np.int32 |
float |
float(x) |
int, np.int_, np.int32 |
str |
str(x) |
int, float, np.int_,
np.float64, np.float32,
np.float_, np.int32, complex,
np.complex64, np.complex128 |
complex |
complex(x) |
int, float, np.int_,
np.float64, np.float32,
np.float_, np.int32 |
np.int_ |
np.int_(x) |
int, float, np.float64,
np.float32, np.float_,
np.int32 |
np.int32 |
np.int32(x) |
int, float, np.float64,
np.float32, np.float_,
np.int_ |
np.float_ |
np.float_(x) |
int, float, np.int_,
np.float64, np.float32,
np.int32 |
np.float32 |
np.float32(x) |
int, float, np.int_,
np.float64, np.float_,
np.int32 |
np.float64 |
np.float64(x) |
int, float, np.int_,
np.float32, np.float_,
np.int32 |
np.complex64 |
np.complex64(x) |
int, float, complex,
np.int_, np.float64, np.float32,
np.float_, np.int32,
np.complex128 |
np.complex128 |
np.complex128(x) |
int, float, complex,
np.int_, np.float64, np.float32,
np.float_, np.int32,
np.complex64 |
- intへの変換では、小数部分が切り捨てられる。
- floatおよびnp.float64への変換では、範囲内であれば精度が失われることはない。
- np.float32 への変換では、floatやnp.float64からの変換の際に精度が失われる可能性がある。また、intや np.int_からの変換では、範囲内であれば精度が失われることはないが、np.float32の精度に制限される。
- 文字列への変換に関する注意事項は特にない。ただし、文字列から intや float、np.int、np.float64、np.float32, np.float, np.int32に変換する場合、文字列が適切な数値表現である必要がある。
- 実数型をcomplex型に変換する場合、実部に元の実数が設定され、虚数部はゼロになる。
- np.complex128をnp.float64にキャストすることは直接できない。
6.1.1. 複素数型を実数型にキャストする場合
import numpy as np

c = np.complex128(3 + 4j)

# 実部を取得してfloat64にキャスト
real_part = np.float64(c.real)
print(real_part)  # 3.0

# 虚数部を取得してfloat64にキャスト
imag_part = np.float64(c.imag)
print(imag_part)  # 4.0
6.2. リスト、タプル、ndarray間の変換
| 変換先の型 | 元の型 | キャスト方法 |
|---|---|---|
tuple |
list, np.ndarray |
tuple(x) |
list |
tuple, np.ndarray |
list(x) |
list |
np.ndarray, x はndarray (ndarrayはこちらを推奨) |
x.tolist() |
np.ndarray |
tuple, list |
np.array(x) or np.asarray(x) |
- 配列要素に関係なく可能。
- 異なる型が混在する場合、すべての要素が最も包括的な型に変換される。
6.3. 具体例
6.3.1. リストを np.ndarrayに変換
import numpy as np

mixed_list = [1, 2.0, 3 + 4j]
mixed_array = np.array(mixed_list) # リストをnp.ndarrayに変換

print(mixed_array) # Output: [1.+0.j 2.+0.j 3.+4.j]
6.3.2. np.ndarrayをlistに変換
- 基本的に
tolist()の使用を推奨する。- 1次元の場合,
list()とtolist()は同じ。多次元の場合、動作が異なる。 list()を使用する場合、np.ndarrayの最外部の次元のみがリストに変換される。tolist()を使用する場合、np.ndarrayのすべての次元が再帰的にリストに変換される。
- 1次元の場合,
6.3.2.1.
list(x)を利用した変換例
import numpy as np

x = np.array([[1, 2], [3, 4]])
lst = list(x)
print(lst)  # [array([1, 2]), array([3, 4])]
# リストの第一要素にndarray[1,2]が格納、第二要素にndarray[3,4]が格納。
6.3.2.2.
tolist(x)を利用した変換例
import numpy as np

x = np.array([[1, 2], [3, 4]])
lst = x.tolist()
print(lst)  # [[1, 2], [3, 4]]
# リストの第一要素にリスト[1,2]が格納、第二要素にリスト[3,4]が格納。
7. 出力
7.1. 概要
| 出力 | Python3 | Fortran90 |
|---|---|---|
| 端末 | print(x) |
print *, x |
| 書式指定 | print(f"{x:.2f}") |
write(*,'(F6.2)') x |
| 文字型改行あり | print("Hello") |
write(*,'(A)') 'Hello' |
| 文字型改行なし | print("Hello", end="") |
write(*,'(A)', advance='no') 'Hello' |
| 実数型改行あり | print(3.14) |
write(*,'(F6.2)') 3.14 |
| 実数型改行なし | print(3.14, end="") |
write(*,'(F6.2)', advance='no') 3.14 |
7.1.1. 端末への出力
n = 7
x = 89.0123

print("{} {}".format(n, x)) # 書式指定せずにターミナル出力
print("{:d} {:.6f}".format(n, x)) # 書式指定してターミナル出力
7.1.2. ファイルへ出力
7.1.2.1. 変数を出力する場合
n = 7
x = 89.0123

with open("output.txt", "w") as file: # ファイル出力
    file.write("{:d} {:.6f}".format(n,x))
7.1.2.2. ndarrayを出力する場合
- 推奨例
integers = np.array([1, 2, 3], dtype=int)
floats1 = np.array([1.0/3.0, 4.00, 2.123456789012345], dtype=float)
floats2 = np.array([0.1234567890123456, -1.234567890123456, 3.141592653589793],   dtype=float)

combined_array = np.column_stack((integers, floats1, floats2))

with open("output_e_f.txt", "w") as file:
    np.savetxt(file, combined_array, fmt=("%d", "%f", "%e"))
with open("output_17f_17e.txt", "w") as file:
np.savetxt(file, combined_array, fmt=("%d", "%.17f", "%.17e"))- 出力例
# output_e_f.txt
1 0.333333 1.234568e-01
2 4.000000 -1.234568e+00
3 2.123457 3.141593e+00

# output_17f_17e.txt
1 0.33333333333333315 1.23456789012345605e-01
2 4.00000000000000000 -1.23456789012345602e+00
3 2.12345678901234512 3.14159265358979312e+00- その他の出力例
x = np.array([1.234567, 89.012345, 678.901234], dtype=float)
y = np.array([9.876543, 21.098765, 432.109876], dtype=float)
z = np.array([0.123456, 7.890123, 654.321098], dtype=float)
n = np.array([1,2,3], dtype=int)

# for 文で逐次的に出力:遅い
with open("output.txt", "w") as file:
    for i in range(len(x)):
        file.write("{} {} {} {}\n".format(n[i], x[i], y[i], z[i]))

# 同一の型で同一サイズの場合、結合して出力:型・サイズが同一の場合のみ
data = np.column_stack((x, y, z))
with open("output.txt", "w") as file:
    np.savetxt(file, data, fmt="%.6f", delimiter=" ")

# 異なる型, 結合, 書式指定:サイズは同一の場合のみ
combined_array = np.column_stack((n, x, y))
with open("output.txt", "w") as file:
    np.savetxt(file, combined_array, fmt=("%d", "%.2f", "%.3f"))
テキスト形式での保存と読み込み 保存:
np.savetxt("file.txt", data, fmt="%.6f", delimiter=" ")読み込み:data = np.loadtxt("file.txt")バイナリ形式での保存と読み込み 保存:
np.save("file.npy", data)読み込み:data = np.load("file.npy")複数のndarrayをバイナリ形式で 1 つのファイルに保存し、読み込む 保存:
np.savez("file.npz", x=data1, y=data2, z=data3)読み込み:with np.load("file.npz") as loaded_data: data1 = loaded_data["x"] data2 = loaded_data["y"] data3 = loaded_data["z"]
7.2. 整数型
7.2.1. 整数型書式 具体例
n1 = 10
n2 = -71
n3 = 0
print("{},{},{}".format(n1, n2, n3)) # 10,-71,0
print("{:d},{:d},{:d}".format(n1, n2, n3)) # 10,-71,0
print("{:5d},{:5d},{:5d}".format(n1, n2, n3)) # ␣␣␣10,␣␣-71,␣␣␣␣0

n4 = 1234567890123456789012345678901234567890123456789012345678901234567890
print("{}".format(n4)) # 1234567890123456789012345678901234567890123456789012345678901234567890
print("{:d}".format(n4)) # 1234567890123456789012345678901234567890123456789012345678901234567890
print("{:5d}".format(n4)) # 1234567890123456789012345678901234567890123456789012345678901234567890
7.2.2. 整数型書式 詳細
n1 = 10; n2 = -71; n3 = 0| 書式指定 | n1 の表示例 | n2 の表示例 | n3 の表示例 |
|---|---|---|---|
{} |
10 | -71 | 0 |
{:d} |
10 | -71 | 0 |
{:+d} |
+10 | -71 | +0 |
{:05d} |
00010 | -0071 | 00000 |
{:5d} |
␣ ␣ ␣ 10 | ␣ ␣ -71 | ␣ ␣ ␣ ␣ 0 |
{:>5d} |
␣ ␣ ␣ 10 | ␣ ␣ -71 | ␣ ␣ ␣ ␣ 0 |
{:=5d} |
␣ ␣ ␣ 10 | -␣ ␣ 71 | ␣ ␣ ␣ ␣ 0 |
{:<5d} |
10 ␣ ␣ ␣ | -71 ␣ ␣ ␣ | 0 ␣ ␣ ␣ ␣ |
{:^5d} |
␣ 10 ␣ ␣ | ␣ -71 ␣ | ␣ ␣ 0 ␣ ␣ |
{:<+5d} |
+10 ␣ ␣ | -71 ␣ ␣ | +0 ␣ ␣ ␣ |
7.3. 実数型
7.3.1. 実数型書式 具体例
y = 1.0 / 3.0
print("{},{}".format(y, y)) # 0.3333333333333333,0.3333333333333333
print("{:f},{:e}".format(y, y)) # 0.333333,3.333333e-01
print("{:.3e},{:.3e}".format(y, y)) # 0.333,3.333e-01
print("{:.17f},{:.17e}".format(y, y)) # 0.33333333333333331,3.33333333333333315e-01
z = 4.0
print("{},{}".format(z, z)) # 4.0,4.0
print("{:f},{:e}".format(z, z)) # 4.000000,4.000000e+00
print("{:.3f},{:.3e}".format(z, z))  # 4.000,4.000e+00
print("{:.17f},{:.17e}".format(z, z))# 4.00000000000000000,4.00000000000000000e+00
w = (1.0 / 3.0) * 1e150
print("{},{}".format(w, w)) # 3.333333333333333e+149,3.333333333333333e+149
print("{:f},{:e}".format(w, w)) # 333333333333333311802(...150桁分)9120.000000,3.333333e+149
print("{:.3f},{:.3e}".format(w, w)) # 333333333333333311802(...150桁分)9120.000,3.333e+149
print("{:.17f},{:.17e}".format(w, w)) # 333333333333333311802(...150桁分)9120.00000000000000000,3.33333333333333312e+149
7.3.2. 実数型書式 詳細
7.3.2.1. 実数表記
x1 = 1.07; x2 = -23.4; x3 = 0| 書式指定 | x1 の表示例 | x2 の表示例 | x3 の表示例 |
|---|---|---|---|
{} |
1.07 | -23.4 | 0.0 |
{:f} |
1.070000 | -23.400000 | 0.000000 |
{:+f} |
+1.070000 | -23.400000 | +0.000000 |
{:08.2f} |
00001.07 | -0023.40 | 00000.00 |
{:8.2f} |
␣ ␣ ␣ ␣ 1.07 | ␣ ␣ -23.40 | ␣ ␣ ␣ ␣ 0.00 |
{:>8.2f} |
␣ ␣ ␣ ␣ 1.07 | ␣ ␣ -23.40 | ␣ ␣ ␣ ␣ 0.00 |
{:=8.2f} |
␣ ␣ ␣ ␣ 1.07 | -␣ ␣ 23.40 | ␣ ␣ ␣ ␣ 0.00 |
{:<8.2f} |
1.07 ␣ ␣ ␣ ␣ | -23.40 ␣ ␣ | 0.00 ␣ ␣ ␣ ␣ |
{:^8.2f} |
␣ ␣ 1.07 ␣ ␣ | ␣ -23.40 ␣ | ␣ ␣ 0.00 ␣ ␣ |
{:<+8.2f} |
+1.07 ␣ ␣ ␣ | -23.40 ␣ ␣ | +0.00 ␣ ␣ ␣ |
7.3.2.2. 指数表記
x1 = 2.0/3.0 *1e150; x2 = -23.4; x3 = 0| 書式指定 | x1 の表示例 | x2 の表示例 | x3 の表示例 |
|---|---|---|---|
{} |
6.666666666666666e+149 | -23.4 | 0.0 |
{:e} |
6.666667e+149 | -2.340000e+01 | 0.000000e+00 |
{:+e} |
+6.666667e+149 | -2.340000e+01 | +0.000000e+00 |
{:15.3e} |
000006.667e+149 | -000002.340e+01 | 0000000.000e+00 |
{:15.3e} |
␣ ␣ ␣ ␣ ␣ 6.667e+149 | ␣ ␣ ␣ ␣ ␣ -2.340e+01 | ␣ ␣ ␣ ␣ ␣ ␣ 0.000e+00 |
{:>15.3e} |
␣ ␣ ␣ ␣ ␣ 6.667e+149 | ␣ ␣ ␣ ␣ ␣ -2.340e+01 | ␣ ␣ ␣ ␣ ␣ ␣ 0.000e+00 |
{:=15.3e} |
␣ ␣ ␣ ␣ ␣ 6.667e+149 | -␣ ␣ ␣ ␣ 2.340e+01 | ␣ ␣ ␣ ␣ ␣ ␣ 0.000e+00 |
{:<15.3e} |
6.667e+149 ␣ ␣ ␣ ␣ ␣ | -2.340e+01 ␣ ␣ ␣ ␣ ␣ | 0.000e+00 ␣ ␣ ␣ ␣ ␣ ␣ |
{:^15.3e} |
␣ ␣ 6.667e+149 ␣ ␣ ␣ | ␣ ␣ -2.340e+01 ␣ ␣ ␣ | ␣ ␣ ␣ 0.000e+00 ␣ ␣ ␣ |
{:<+15.3e} |
+6.667e+149 ␣ ␣ ␣ ␣ | -2.340e+01 ␣ ␣ ␣ ␣ ␣ | +0.000e+00 ␣ ␣ ␣ ␣ ␣ |
7.4. 文字
7.4.1. 文字型書式 具体例
str1 = "hello"
str2 = "this is"
str3 = "a"
print("{},{},{}".format(str1, str2, str3)) # hello,this is,a
print("{:10s},{:10s},{:10s}".format(str1, str2, str3)) # hello     ,this is   ,a
7.4.2. 文字型書式 詳細
str1 = "hello"; str2 = "this is"; str3 = "a"| 書式指定 | str1 の表示例 | str2 の表示例 | str3 の表示例 |
|---|---|---|---|
{} |
hello | this ␣ is | a |
{:s} |
hello | this ␣ is | a |
{:10s} |
hello␣ ␣ ␣ ␣ ␣ | this ␣ is␣ ␣ ␣ | a␣ ␣ ␣ ␣ ␣ ␣ ␣ ␣ ␣ |
{:>10s} |
␣ ␣ ␣ ␣ hello | ␣ ␣ this ␣ is | ␣ ␣ ␣ ␣ ␣ ␣ ␣ ␣ ␣ a |
{:<10s} |
hello ␣ ␣ ␣ ␣ ␣ | this ␣ is ␣ ␣ ␣ | a ␣ ␣ ␣ ␣ ␣ ␣ ␣ ␣ ␣ |
{:^10s} |
␣ ␣ hello ␣ ␣ ␣ | ␣ this ␣ is␣ ␣ | ␣ ␣ ␣ ␣ a ␣ ␣ ␣ ␣ ␣ |
7.5. ndarrayの出力
7.5.1. 一次元配列
x = np.array([1.234567, 89.012345, 678.901234], dtype=float)
y = np.array([9.876543, 21.098765, 432.109876], dtype=float)
n = np.array([1,2,3], dtype=int)

# 最も推奨
combined_array = np.column_stack((n, x, y))
with open("output_17f_17e.txt", "w") as file:
    np.savetxt(file, combined_array, fmt=("%d", "%.17f", "%.17e"))

# for 文で逐次的に出力:明解だが遅い
with open("output_for.txt", "w") as file:
    for i in range(len(x)):
        file.write("{} {} {}\n".format(n[i], x[i], y[i]))

# 同一の型で同一サイズの場合、結合して出力:型・サイズは同一の場合
data = np.column_stack((x, y))
with open("output_same.txt", "w") as file:
    np.savetxt(file, data, fmt="%.6f", delimiter=" ")

# 異なる型, 結合, 書式指定:サイズは同一の場合
combined_array = np.column_stack((n, x, y))
with open("output_each.txt", "w") as file:
    np.savetxt(file, combined_array, fmt=("%d", "%.2f", "%.3f"))
7.5.2. 二次元配列
import numpy as np

if __name__ == '__main__':
    # 4x4の二次元配列を作成
    xx = np.random.rand(4, 4)

    # 方法1. 連結して出力、早い
    row_indices = np.arange(xx.shape[0])  # 行番号の配列を作成
    array_with_row_indices = np.column_stack((row_indices, xx))  # 横方向に連結
    np.savetxt("output_with_row_indices.txt", array_with_row_indices, fmt="%d %.4f %.4f %.4f %.4f")

    # 方法2. for文で愚直に:明解だが遅い
    with open("output_direct_access.txt", "w") as file:
        for i in range(xx.shape[0]):
            file.write(f"{i:d} ")  # 行番号を書き込み, f-string使用
            for j in range(xx.shape[1]):
                file.write(f"{xx[i, j]:.4f} ")  # 配列の要素を直接書き込み, f-string使用
            file.write("\n")  # 改行
# output_with_row_indices.txt, output_direct_access.txtの出力例
0 0.1567 0.0359 0.8930 0.3195
1 0.5033 0.6877 0.7716 0.9325
2 0.7364 0.5647 0.0922 0.9466
3 0.0662 0.9055 0.7820 0.59558. 読み込み
8.1. 一次元ndarrayを読み込む
8.1.1. pandas
のread_csvを利用する(csv に限らず使用可)
8.1.1.1. タイトル名がないファイルの場合
読み込むファイルmixed_data.csvの生成
import csv
import numpy as np

# 各列のデータ
integers = np.array([1, 2, 3])
strings = np.array(["apple", "banana", "cherry"])
floats = np.array([1.5, 2.5, 1.0/3.0])
complex_numbers = np.array([complex(1, 2), complex(3, 4), complex(5, 6)])

# CSVファイルにデータを書き込む
with open("mixed_data.csv", mode="w", newline="", encoding="utf-8") as f:
    writer = csv.writer(f)
    for i, s, f, c in zip(integers, strings, floats, complex_numbers):
        writer.writerow([i, s, f, c.real, c.imag])
出力結果
integers,strings,floats,complex_real,complex_imag
1,apple,1.5,1.0,2.0
2,banana,2.5,3.0,4.0
3,cherry,0.3333333333333333,5.0,6.0
上記出力結果を読み込んで、ndarray に格納する方法は下記の通り
import pandas as pd
import numpy as np

# CSVファイルを読み込む
df = pd.read_csv("mixed_data.csv", header=None, names=["integers", "strings", "floats", "complex_real", "complex_imag"])

# 各列をそれぞれの型のndarrayに変換する
integer_array = df["integers"].values
string_array = df["strings"].values
float_array = df["floats"].values
complex_array = df["complex_real"].values + 1j * df["complex_imag"].values

print("Integer array:", integer_array)
print("String array:", string_array)
print("Float array:", float_array)
print("Complex array:", complex_array)
8.1.1.2. タイトル名があるファイルの場合
読み込むファイルmixed_data.csvの生成
import csv
import numpy as np

# タイトル名
titles = ["integers", "strings", "floats", "complex_real", "complex_imag"]

# 各列のデータ
integers = np.array([1, 2, 3])
strings = np.array(["apple", "banana", "cherry"])
floats = np.array([1.5, 2.5, 3.5])
complex_numbers = np.array([complex(1, 2), complex(3, 4), complex(5, 6)])

# CSVファイルにデータを書き込む
with open("mixed_data_with_titles.csv", mode="w", newline="", encoding="utf-8") as f:
    writer = csv.writer(f)

    # タイトル名を書き込む
    writer.writerow(titles)

    # データを書き込む
    for i, s, f, c in zip(integers, strings, floats, complex_numbers):
        writer.writerow([i, s, f, c.real, c.imag])
出力結果
integers,strings,floats,complex_real,complex_imag
1,apple,1.5,1.0,2.0
2,banana,2.5,3.0,4.0
3,cherry,3.5,5.0,6.0
上記出力結果を読み込んで、ndarray に格納する方法は下記の通り
import pandas as pd
import numpy as np

# CSVファイルを読み込む
df = pd.read_csv("mixed_data_with_titles.csv")

# 各列をそれぞれの型のndarrayに変換する
integer_array = df["integers"].values
string_array = df["strings"].values
float_array = df["floats"].values
complex_array = df["complex_real"].values + 1j * df["complex_imag"].values

print("Integer array:", integer_array)
print("String array:", string_array)
print("Float array:", float_array)
print("Complex array:", complex_array)
8.1.2.
np.loadtxtを利用する
下記で出力されたoutput_np.txtがあったとする。
data = np.column_stack((x, y, z))
np.savetxt("output_np.txt", data, fmt="%.6f", delimiter=" ")下記のnumpy.loadtxtを利用して読み込める。
import numpy as np

# ファイルを読み込む
data = np.loadtxt("output_np.txt")

# 配列をx, y, zに分割する
x, y, z = data[:, 0], data[:, 1], data[:, 2]np.loadtxt()関数は、デフォルトで自動的にデータ型を推測し、適切なデータ型に変換してくれる。
8.1.3. (例)様々な型を読み込みたい場合
data.txtに、下記の情報が書かれている。
- N行分データがある
- それぞれの行の1列目に整数、2列目に実数、3列目に複素数型の実部、4列目に複素数型の虚部、5行目に文字列がある
このdata.txtを読み込んで、n(整数型 ndarray), x(実数型
ndarray), z(複素数型ndarrayで3,4列目を使用します),
str(文字列型配列)に格納したい。
import numpy as np

# data.txtを読み込み、各列をそれぞれの型に変換
data = np.loadtxt("data.txt", dtype='object', comments=None, delimiter=" ")

# 各列を指定した型のndarrayに変換
n = data[:, 0].astype(int)
x = data[:, 1].astype(float)
z_real = data[:, 2].astype(float)
z_imag = data[:, 3].astype(float)
z = z_real + z_imag * 1j  # 複素数型のndarrayに変換
str_array = data[:, 4].astype(str)

# 確認
print("n:", n)
print("x:", x)
print("z:", z)
print("str_array:", str_array)
8.1.4. 一文を読み込む
with open('./test.txt') as f:
    for line in f:
       print(line, type(line))
test.txt の中身
sin cos
11223
959.202

re q 22
11 404
実行結果
sin cos
 <class 'str'>
11223
 <class 'str'>
959.202
 <class 'str'>

 <class 'str'>
re q 22
 <class 'str'>
11 404
 <class 'str'>
一文丸ごと読まれる。
8.2. 二次元ndarrayを読み込む
次のPythonプログラムで、読み込みに使用するtxtファイルを書き出したとする。
import numpy as np

# 5x5の二次元ndarrayの実数行列を作成
matrix = np.random.rand(5, 5)

# テキストファイルに行列を書き出す
np.savetxt('matrix.txt', matrix, fmt='%f')
matrix.txt の中身は具体的に下記のようになる。
0.598899 0.791573 0.453733 0.156499 0.541144
0.499096 0.553211 0.029028 0.189387 0.489296
0.333952 0.274784 0.667436 0.169884 0.937856
0.563854 0.839040 0.982666 0.650543 0.770184
0.213031 0.653024 0.021765 0.205727 0.701766下記のプログラムでmatrix.txtを読み込める。
import numpy as np

# テキストファイルから行列を読み込む
loaded_matrix = np.loadtxt('matrix.txt')

print(type(loaded_matrix))
print(loaded_matrix)
読み込んだ後のprint文の出力結果は、下記のようになる。
<class 'numpy.ndarray'>
[[0.598899 0.791573 0.453733 0.156499 0.541144]
 [0.499096 0.553211 0.029028 0.189387 0.489296]
 [0.333952 0.274784 0.667436 0.169884 0.937856]
 [0.563854 0.83904  0.982666 0.650543 0.770184]
 [0.213031 0.653024 0.021765 0.205727 0.701766]]
9. for文
9.1. 基本的なforループ
for i in range(5):
    print(i) # out: 0 1 2 3 4 (改行は省略)
9.2. リストの要素をイテレート
my_list = ['apple', 'banana', 'cherry']

for item in my_list:
    print(item) # apple banana cherry (改行は省略)
※イテレート(iterate): 反復する
9.2.1. インデックスと要素を一緒にイテレート
enumerate関数を使用して、リストmy_listのインデックスと要素を同時にイテレート
my_list = ['apple', 'banana', 'cherry']

for index, item in enumerate(my_list):
    print(f"{index} {item}")
出力結果
0 apple
1 banana
2 cherry
9.3. リスト内包表記(List Comprehension)
- リスト内包表記は、簡潔な構文で新しいリストを生成するための Python特有の機能
squares = [x**2 for x in range(5)]
print(squares) # [0, 1, 4, 9, 16]
9.4. 2つのリストを同時にイテレート(zip関数を使用)
- zip関数を使用して、2つのリストを同時にイテレートし、それぞれの要素を出力
list1 = [1, 2, 3]
list2 = [4, 5, 6]

for a, b in zip(list1, list2):
    print(a, b)
出力結果
1 4
2 5
3 6
9.5. 2 つ以上のリストを同時にイテレートかつインデックスを取得
list1 = ['a', 2, 3.0]
list2 = [4.0, 5.1, 6]
list3 = ['g', 'h', 'i']

for index, (elem1, elem2, elem3) in enumerate(zip(list1, list2, list3)):
    print(f"{index}  {elem1} {elem2} {elem3}")
出力結果
0  a 4.0 g
1  2 5.1 h
2  3.0 6 i
10. if文
10.1. 書き方
10.1.1. 基本的な if文
x = 10

if x > 5:
    print("x is greater than 5")

# "x is greater than 5"
10.1.2. if-elif-else文
x = 10

if x > 20:
    print("x is greater than 20")
elif x > 10:
    print("x is greater than 10 but less than or equal to 20")
else:
    print("x is less than or equal to 10")

# "x is less than or equal to 10"
10.1.3. 1行で条件分岐を実装(三項演算子)
x = 10
result = "x is even" if x % 2 == 0 else "x is odd"
print(result) # 0- 簡潔な条件分岐の場合に利用する。多用すると可読性が下がるので注意して使う。
10.1.4. リスト内包表記と条件分岐
numbers = [1, 2, 3, 4, 5, 6, 7, 8, 9]
even_squares = [x ** 2 for x in numbers if x % 2 == 0]
print(even_squares)  # [4, 16, 36, 64]
10.2. 演算子
10.2.1. 比較演算子
| 演算子 | Pythonの書き方の例 | 意味 |
|---|---|---|
| == | x == y | x = y |
| != | x != y | x ≠ y |
| < | x < y | x < y |
| > | x > y | x > y |
| <= | x <= y | x ≤ y |
| >= | x >= y | x ≥ y |
x = 5
y = 10

print(x == y)  # False
print(x != y)  # True
print(x < y)   # True
print(x > y)   # False
print(x <= y)  # True
print(x >= y)  # False
10.2.2. 論理演算子
| 演算子 | Pythonの書き方の例 | 意味 |
|---|---|---|
| and | x and y | x と y の両方が真であれば真 |
| or | x or y | x または y のどちらかが真であれば真 |
| not | not x | x が偽であれば真 |
x = 5

# andの使用例
if x > 0 and x < 10:
    print("x is between 0 and 10")

# orの使用例
if x < 0 or x > 10:
    print("x is outside the range of 0 to 10")
else:
    print("x is within the range of 0 to 10")

# notの使用例
if not (x == 0):
    print("x is not equal to 0")
10.2.3. その他の演算子
| 演算子 | 書き方の例 | 意味 |
|---|---|---|
| in | x in y | x が y の中にある場合に真 |
| not in | x not in y | x が y の中にない場合に真 |
| is | x is y | x が y と同一オブジェクトの場合に真 |
| is not | x is not y | x が y と異なるオブジェクトの場合に真 |
- 使用方法は下記参照
- is や is not 演算子は、オブジェクトの同一性をチェックするために使用される
- is や is not 演算子は、数値や文字列などのイミュータブルなデータ型の比較には、通常 == や != などの比較演算子を使用する
10.2.3.1.
in演算子の例(リスト)
fruits = ["apple", "banana", "orange"]

if "apple" in fruits:
    print("Apple is in the list of fruits")
else:
    print("Apple is not in the list of fruits")

# Apple is in the list of fruits
10.2.3.2.
in演算子の例(文字列)
text = "Hello, world!"

if "o, worl" in text:
    print("The word 'world' is in the text")
else:
    print("The word 'world' is not in the text")

# The word 'o, worl' is in the text
10.2.3.3. not in演算子の例
fruits = ["apple", "banana", "orange"]

if "grape" not in fruits:
    print("Grape is not in the list of fruits")
else:
    print("Grape is in the list of fruits")

# Grape is not in the list of fruits
10.2.3.4. is 演算子の例
x = [1, 2, 3]
y = [1, 2, 3]
z = x

if x is y:
    print("x and y are the same object")
else:
    print("x and y are different objects")

# x and y are different objects

if x is z:
    print("x and z are the same object")
else:
    print("x and z are different objects")

# x and z are the same object
10.2.3.5. is not 演算子の例
x = [1, 2, 3]
y = [1, 2, 3]

if x is not y:
    print("x and y are not the same object")
else:
    print("x and y are the same object")
11. 関数
11.1. 関数の利用方法
11.1.1. 型ヒントを使用する書き方(推奨)
import numpy as np

def func(i:int, j:int) -> float:
    return 10.0 *i * j

if __name__ == '__main__':
    x = func(3,5)
    print(x) # 150.0
11.1.2. 型ヒントを使用しない書き方(非推奨)
import numpy as np

def func(i, j):
    return 10.0 *i * j

if __name__ == '__main__':
    x = func(3,5)
    print(x) # 150.0
11.2. 型ヒント
- 通常の
Pythonの実行(
> python main.py)では、関数の引数の入出力チェックは行われないので、可読性以外に影響はない。 - 型ヒントを使用している場合、静的型チェッカー(
> mypy main.py)を実施することができる。 - 単一変数の場合は型ヒントを積極的に使用すると可読性が上がる。
- ndarrayを引数とするときは、型ヒントはndarrayだけを明記する程度で良い。ndarrayの詳細ドキュメントで書く。
11.2.1. 型ヒントを使用する場合
def func(i: int, j: int) -> float:
    return 0.1 * i * j
11.2.2. 配列の型ヒント
11.2.2.1. リスト・タプルの型ヒント
from typing import List, Tuple


def example_function(tuple_arg: Tuple[int, int], list_arg: List[int]) -> None:
    print(f"Tuple argument: {tuple_arg}")
    print(f"List argument: {list_arg}")


if __name__ == "__main__":
    example_tuple = (1, 2)  # mutable
    example_list = [3, 4, 5]  # immutable

    example_function(example_tuple, example_list)
11.2.2.2. ndarrayの型ヒント
import numpy as np


def matrix_multiply(n: np.int32, A: np.ndarray, B: np.ndarray) -> np.ndarray:
    C = n * np.dot(A, B)
    return C


if __name__ == "__main__":

    A = np.array([[1, 2, 3], [4, 5, 6], [7, 8, 9]], dtype=np.float64)
    B = np.array([2, 3, 4], dtype=np.float64)

    result = matrix_multiply(np.int64(2), A, B)
    print(result) # Out: [ 40.  94. 148.]
11.2.2.3. 詳細なndarrayの型ヒントを書く場合
from numpy.typing import NDArray
def myfunc(t: np.float64, x: NDArray[np.float64]) -> None:- typingモジュールのNDArrayで、ndarrayの型も指定できる。
- 関数の返り値無し (None)
11.2.2.4. 自作クラスの型ヒントを書く場合
from my_class import MyClass
def myfunc(p: MyClass) -> int:- 自作クラス
MyClassが、my_class.pyに記述されている場合の書き方 - 関数の返り値はint型。
11.3. 型ヒントを利用しない場合
11.3.1. 型ヒントを使用しない場合
def func(i, j):
    return 0.1 * i * j
11.3.2. Google style
def func(i: int, j: int) -> float:
    """
    Calculate the product of i and j, multiplied by 0.1.

    Args:
        i (int): The first integer.
        j (int): The second integer.

    Returns:
        float: The result of the calculation.
    """
    return 0.1 * i * j
import numpy as np
def matrix_multiply(n: np.int32, A: np.ndarray, B: np.ndarray) -> np.ndarray:
"""
Calculate the product of a 2D NxN ndarray A and a 1D N-row ndarray B.
Parameters:
n (np.int32): Scalar multiplier
A (numpy.ndarray): A 2D NxN ndarray
B (numpy.ndarray): A 1D N-row ndarray
Returns:
numpy.ndarray: The resulting product of the matrix multiplication
"""
C = n * np.dot(A, B)
return C
if __name__ == "__main__":
A = np.array([[1, 2, 3], [4, 5, 6], [7, 8, 9]], dtype=np.float64)
B = np.array([2, 3, 4], dtype=np.float64)
result = matrix_multiply(np.int64(2), A, B)
print(result) # Out: [ 40. 94. 148.]11.3.3. 同一関数名で、引数の型に応じて処理を変える
from typing import Union

def process_input(value: Union[int, str]) -> int:
    if isinstance(value, int):
        return value
    elif isinstance(value, str):
        return len(value)
    else:
raise TypeError("Invalid input type. Expected int or str.")関数process_inputは、引数として int型または str
型を想定し、出力は int型とする。
関数内で、isinstanceを使用して型に応じた動作をさせるコード。
12. 例外処理
12.1. try/catch 構文
try/catch 構文を利用して、例外処理を実施できる。
try:
    # ここにエラーが発生する可能性のあるコードを書く
    x = 1 / 0
except:
    # ここにエラーが発生したときの処理を書く
print("An error occurred")理想的にはtryブロック内のコードは数行(3-5
行程度)に抑えることが推奨される。
12.2. 特定のエラーが起きた際の処理
12.2.1. 一般的なエラータイプ
| エラータイプ | 説明 |
|---|---|
| ZeroDivisionError | 0 で除算したときに発生 |
| TypeError | 間違った型のオブジェクトを操作しようとしたときに発生(例えば、文字列を整数で割ろうとしたときなど) |
| ValueError | 間違った値を関数や演算子に渡したときに発生(例えば、整数を期待する関数に文字列を渡したときなど) |
| FileNotFoundError | 存在しないファイルを開こうとしたときに発生 |
12.2.2. 例外を生じさせる場合
if drink_type == "tea":
    # teaの場合の処理
elif drink_type == "coffee":
    # coffeeの場合の処理
else:
    raise ValueError(f"Unexpected component: your drink_type = {drink_type}")
12.2.3. 特定のエラーを取得する具体的なプログラム
try:
    # ここにエラーが発生する可能性のあるコードを書く
    x = 1 / 0
except ZeroDivisionError:
    # ゼロ除算エラーが発生したときの処理を書く
    print("Divided by zero")
except TypeError:
    # 型エラーが発生したときの処理を書く
    print("Wrong type")
# ...
12.3. try/catch/finally 構文
finally ブロックを使用すると、エラーが発生しようがしまいが、try/except ブロックを抜けるときに必ず実行されるコードを書くことができる。
try:
    # ここにエラーが発生する可能性のあるコードを書く
    x = 1 / 0
except ZeroDivisionError:
    # ゼロ除算エラーが発生したときの処理を書く
    print("Divided by zero")
finally:
    # ここには、エラーが発生しようがしまいが、必ず実行されるコードを書く
    print("This will always be printed")
実行結果
Divided by zero
This will always be printed
12.4. try 構文のネスト
try:
    try:
        # 内側のtryブロック
        x = 1 / 0
    except ValueError:
        print("This will not catch a division by zero error")
    # その他のコード...
except ZeroDivisionError:
    print("This will catch the division by zero error")
実行結果
This will catch the division by zero error13. クラス
13.1. Pythonにおけるクラスの一般的な使用方法
- Pythonでは、特別なゲッターとセッターメソッドを使用せずに、属性に直接アクセスするのが一般的
- Pythonでは、すべての属性がデフォルトでパブリック
- Pythonでは、慣習的にアンダースコアで始まる属性(例:_attribute)は、クラスの外部からアクセスしないことが暗黙の了解とされている。ただし、これは強制されるものではない。
13.2. クラスを利用した具体例
13.2.1. (例) 人の名前・年
クラスの基本である
- クラス定義とコンストラクタ
- クラスメソッド
- クラス変数
- インスタンス変数、継承
を利用したプログラム例
class Person:
    def __init__(self, name: str, age: int): # コンストラクタ
        self.name = name # インスタンス変数
        self.age = age   # インスタンス変数

    def greet(self):     # クラスメソッド
        print(f"Hello, my name is {self.name} and I am {self.age} years old.")


class Student(Person):   # Personクラスの継承 (Personクラスが基底、StudentクラスがPersonクラスの派生)
    def __init__(self, name: str, age: int, student_id: int): # コンストラクタ
        super().__init__(name, age)   # super()は、基底クラスの関数を呼び出すための関数
        self.student_id = student_id  # インスタンス変数

    def greet(self):     # クラスメソッド
        super().greet()  # 基底クラスのメソッドの呼び出し
        print(f"My student ID is {self.student_id}.")


if __name__ == "__main__":
    person = Person("Alice", 30)
    person.greet()

    student = Student("Bob", 20, 12345)
    student.greet()
出力
Hello, my name is Alice and I am 30 years old.
Hello, my name is Bob and I am 20 years old.
My student ID is 12345.
13.2.2. (例) 二次元ベクトルクラス
- クラス定義
- コンストラクタ
- クラスメソッド
- インスタンス変数
- 継承
import math

class Vector2D:
    def __init__(self, x: float, y: float):
        self.x = x # インスタンス変数
        self.y = y # インスタンス変数

    def length(self) -> float: # クラスメソッド
        return math.sqrt(self.x ** 2 + self.y ** 2)

    def dot_product(self, other: 'Vector2D') -> float: # クラスメソッド
        return self.x * other.x + self.y * other.y

    def __str__(self) -> str: # 特殊メソッド(オブジェクトを文字列形式で表現する際に使用される。オブジェクトの文字列表現がカスタマイズされる)
        return f"({self.x}, {self.y})"


class UnitVector2D(Vector2D): # Vector2Dの派生クラス
    def __init__(self, x: float, y: float): # コンストラクタ
        length = math.sqrt(x ** 2 + y ** 2)
        super().__init__(x / length, y / length) # 基底クラスのコンストラクタ継承

    def length(self) -> float: # 基底クラスのlengthメソッドをoverride
        return 1.0


if __name__ == "__main__":
    vector1 = Vector2D(3, 4)
    vector2 = Vector2D(1, 2)

    print("Vector 1:", vector1)
    print("Vector 2:", vector2)
    print("Dot product:", vector1.dot_product(vector2))

    unit_vector1 = UnitVector2D(3, 4)
    print("Unit vector 1:", unit_vector1)
    print("Length of unit vector 1:", unit_vector1.length())
出力
Vector 1: (3, 4)
Vector 2: (1, 2)
Dot product: 11
Unit vector 1: (0.6, 0.8)
Length of unit vector 1: 1.0
13.2.3. (例) 二次元ベクトルクラス2
- クラス定義
- コンストラクタ
- クラスメソッド
- クラス変数
- インスタンス変数
- 継承
import math

class Vector2D:
    num_vectors = 0  # クラス変数

    def __init__(self, x: float, y: float):
        self.x = x  # インスタンス変数
        self.y = y  # インスタンス変数
        Vector2D.num_vectors += 1  # クラス変数の更新

    def magnitude(self) -> float:
        return math.sqrt(self.x**2 + self.y**2)

    @classmethod  # クラスメソッドのデコレータ
    def num_vectors_created(cls) -> int:
        return cls.num_vectors

# 継承
class NamedVector2D(Vector2D):
    def __init__(self, x: float, y: float, name: str):
        super().__init__(x, y)  # コンストラクタの継承
        self.name = name  # インスタンス変数

    def __str__(self):
        return f"{self.name}: ({self.x}, {self.y})"

if __name__ == "__main__":
    vec1 = NamedVector2D(3, 4, "vec1")
    vec2 = NamedVector2D(5, 12, "vec2")
    print(vec1)  # vec1: (3, 4)
    print(vec2)  # vec2: (5, 12)
    print(f"Total vectors created: {Vector2D.num_vectors_created()}")  # Total vectors created: 2
13.2.4. (例)プロパティを利用
プロパティは、ゲッター(Getter)とセッター(Setter)をまとめた用語として考えれば良い。
- クラスメソッド
- スタティックメソッド
- プロパティ
class Person:
    _population = 0 # クラス変数の定義

    def __init__(self, name: str, age: int):
        self._name = name # インスタンス変数
        self._age = age # インスタンス変数
        Person._population += 1 # クラス変数の更新

    @property # ゲッター (getter)
    def name(self) -> str:
        return self._name

    @property # ゲッター (getter)
    def age(self) -> int:
        return self._age

    @age.setter # セッター (@<attribute>.setterデコレータ)
    def age(self, age: int):
        if age >= 0:
            self._age = age
        else:
            raise ValueError("Age must be a positive integer.")

    @classmethod # クラスメソッド
    def get_population(cls) -> int:
        return cls._population

    @staticmethod # 静的メソッド
    def is_adult(age: int) -> bool:
        return age >= 18


if __name__ == "__main__":
    alice = Person("Alice", 30)
    bob = Person("Bob", 15)

    print("Alice's name:", alice.name)
    print("Alice's age:", alice.age)
    print("Bob's name:", bob.name)
    print("Bob's age:", bob.age)

    bob.age = 18
    print("Bob's new age:", bob.age)

    print("Is Alice an adult?", Person.is_adult(alice.age))
    print("Is Bob an adult?", Person.is_adult(bob.age))

    print("Total population:", Person.get_population())
Alice's name: Alice
Alice's age: 30
Bob's name: Bob
Bob's age: 15
Bob's new age: 18
Is Alice an adult? True
Is Bob an adult? True
Total population: 213.3. クラスの詳細
13.3.1. クラス定義とコンストラクタ
class MyClass:
    def __init__(self, arg1, arg2):
        self.arg1 = arg1
        self.arg2 = arg2
13.3.2. クラスメソッド
class MyClass:
    # ...

    def some_method(self, x):
        return self.arg1 * x + self.arg2
13.3.3. クラス変数とインスタンス変数
class MyClass:
    class_variable = "Shared value"

    def __init__(self, arg1, arg2):
        self.instance_variable1 = arg1
        self.instance_variable2 = arg2
13.3.4. 継承
class MyBaseClass:
    def method1(self):
        pass

class MyDerivedClass(MyBaseClass):
    def method2(self):
        pass
13.3.5. デコレータ
13.3.5.1. プロパティ(ゲッター (getter) とセッター (setter))
13.3.5.1.1. property デコレータを使ってアクセスする場合
property
デコレータを使うことで、カプセル化を保ちつつ、アクセスや変更の制御が可能になる
カプセル化を保ちたい場合は、@propertyを使用して、ゲッターやセッターを定義することが推奨される。
@propertyを使用して、ゲッターやセッターを定義する具体例
class MyClass:
    def __init__(self, x:int):
        self._x = x

    @property
    def x(self) -> int:
        print("Getting x value")
        return self._x

    @x.setter
    def x(self, value):
        print("Setting x value")
        self._x = value

obj = MyClass(10)
print(obj.x)  # Getting x value と出力された後、10が出力される
obj.x = 20 # Setting x value と出力される- この例では、
xというプロパティがゲッターとセッターを持っている _xというプライベート変数にアクセスすることで、カプセル化を維持している- もし
@x.setterを定義しないと、(obj._xでアクセスはしないと慣習づけている限り)読み取り専用となる。
ただし、Pythonではすべての属性がデフォルトでパブリックであるため、必ずしもゲッターやセッターを使用する必要はない。下記の書き方でも可。
class MyClass:
    def __init__(self, x):
        self.x = x

obj = MyClass(10)
print(obj.x)  # 10が出力される
obj.x = 20
13.3.5.1.2. セッター・ゲッターを使用/不使用の比較
プロパティを使用した場合
class Circle:
    def __init__(self, radius):
        self.radius = radius

    @property
    def diameter(self):
        return 2 * self.radius

    @diameter.setter
    def diameter(self, value):
        self.radius = value / 2

circle = Circle(5)
print(circle.diameter)  # 10
circle.diameter = 12
print(circle.radius)  # 6
プロパティを使用しない場合
class Circle:
    def __init__(self, radius):
        self.radius = radius

    def get_diameter(self):
        return 2 * self.radius

    def set_diameter(self, value):
        self.radius = value / 2

circle = Circle(5)
print(circle.get_diameter())  # 10
circle.set_diameter(12)
print(circle.radius)  # 6
プロパティを使用した場合、diameter 属性へのアクセスが、メソッド呼び出しではなく、属性へのアクセスのようにシンプルになる。つまり、
- circle.get_diameter()の代わりに circle.diameter を使用して値を取得できる。
- circle.set_diameter(12)の代わりに circle.diameter = 12 で値を設定できる。
これにより、コードがより直感的で読みやすくなる。
13.3.5.1.3. クラス変数、インスタンス変数へのアクセス
class MyClass:
    class_var = 0

    def __init__(self, x):
        self.instance_var = x

obj = MyClass(10)
print(obj.instance_var)  # インスタンス変数にアクセス:10
print(MyClass.class_var)  # クラス変数にアクセス:0
プロパティは、以下のような用途で使用される。
- カプセル化 クラスの内部状態を隠蔽し、外部からの直接アクセスを制限することで、データの整合性を保つ。プロパティを使うことで、データへのアクセスを制御し、不正な値の代入やデータの破壊を防ぐことができる。
- バリデーション プロパティを使用して、セッター(setter)内で値のバリデーションを行うことができる。これにより、不正な値がセットされることを防ぎ、オブジェクトの状態を正常に保つことができる。
- 計算済みの値の取得 プロパティを使って、計算済みの値や他の属性に依存する値を取得することができる。これにより、クライアントコードが属性を直接操作する代わりに、プロパティを通じて簡単にアクセスできるようになる。
- 属性の変更の追跡 プロパティを使用することで、属性の変更を検知し、その変更に応じた追加の処理を行うことができる。例えば、属性の変更を監視し、変更があった場合にイベントを発火するような場合に有用。
簡単に言うと、プロパティはクラスの属性へのアクセスをより安全で制御可能な方法で提供することで、コードの品質と保守性を向上させることができる。
@propertyデコレータを使用して getter
を定義した後、@<attribute>.setterデコレータを使用して
setter を定義することができる。
14. 他の Pythonファイルを参照する場合
下記の階層構造を持ち、main
プログラムがmain.pyに書かれている場合を考える。
また、main.pyからmy_module0.pyとmy_module1.pyに書かれた関数を呼び出す場合を考える。
project_directory/
│
├── main.py
├── my_module0.py
│
└── my_package/
└── my_module1.pymy_module0.pyとmy_module1.pyには、下記の関数が書かれている。
my_module0.py
def function0():
    return "Hello from function0 in my_module0!"
my_package/my_module1.py
def function1():
return "Hello from function1 in my_module1!"main.pyから上記の関数を呼び出すには、下記の通りに書けば良い。
from my_module0 import function0
from my_package.my_module1 import function1

print(function0())  # Outputs: Hello from function0 in my_module0!
print(function1())  # Outputs: Hello from function1 in my_module1!
15. 変更・更新履歴
初版公開: 2023/07/27 (YYYY/MM/DD)